View & View Group

View가 모인것이 View Group

View GroupView에 대해서 위치를 결정할 수 있다.


Layout


리니어 수평 수직

java.lang.Object
  ↳ android.view.View
    ↳ android.view.ViewGroup

      ↳ android.Widget.LinearLayout


속성 :

기본으로 패딩이 없다.

방향 : orientation : Vertiacal, Horizontal

정렬방향 :

- 부모 : layoutgravity : 부모안에 있는 layout이 정렬됨

- 자식 : gravity : view안에있는 모든 것이 정렬됨

-> layout* : 부모안에있는 / 그냥* : View안에

공간가중치 : 화면에 뷰끼리 위치를 차지 하기 위한 비율 (0 ~ 3), 기본값 0


릴레이티브 뷰간의 관계

- 자식뷰(옆에), 부모뷰(안에)


프레임 화면의 위치를 정해서 사용함

View를 겹칠 수 있다.

한칸에 여러 View가 들어 갈 수 있다.

테이블과 비슷


테이블 - 화면의 위치를 정해서 사용함

View를 겹칠 수 없다.

바둑판형식

레알 테이블모양

java.lang.Object
  ↳ android.view.View
    ↳ android.view.ViewGroup

      ↳ android.Widget.LinearLayout

  ↳ android.Widget.TableLayout

규격화 되어있다. 리니어를 상속 받았기 때문에

<TableRow> </TableRow>

자식들은 열간격은 같고 행간격은 달라질 수 있다.

default : wrap_contents

ex) 리모콘 만들기


android:layout_width / height

- fill_parent : 화면 전체 크기

- match_parent : 부모의 크기 상속

- wrap_content : 안에 객체 내용물에 맞게 맞추어진다. 감싸진다.


앱솔루트 하나의 뷰에 대해서 크기와 높이 값이 정해져 있는 것 (3dp, 4dp) - 잘안씀

높이 100dip 단위 종류가 개 많아

가로 200dip(기본단위)


화면 크기가 다다르니까 배치도 달라진다. 그래서 안씀ㅋㅋㅋㅋ


스크롤뷰

java.lang.Object
  ↳ android.view.View
    ↳ android.view.ViewGroup
      ↳ android.widget.FrameLayout
        ↳ android.widget.ScrollView


1
2
3
4
5
6
7
<ScrollView xmlns:android="http://schemas.android.com/apk/res/android"
    android:layout_width="match_parent"
    android:layout_height="wrap_content" >
 
     /*Something*/
 
</ScrollView>
cs


버튼 종류

Button

확인

Radio Button

남자 여자

property {

  OncheckedChangedListner(){ /*do Something*/ }

  SetOnchangedListner(){ /*do Something*/ }

}

Check Box

티비보기 컴퓨터 책읽기

TextView

EditView

ImageView

  android tint: scaletype maxWidth maxHeight

'Programming > Android' 카테고리의 다른 글

xml 경계선  (0) 2016.09.15
xml include  (0) 2016.09.15
Service  (0) 2016.09.05
R  (0) 2016.09.05
안드로이드의 구성요소 요약  (0) 2016.09.05

서비스는 특정 액티비디와 상관 없이 백그라운드에서 실행되는 컴포넌트이다. 그래서 화면을 구성하는 레이아웃을 작성할 필요가 없다. 그러므로 지속적으로 장시간 동작해야하는 기능(블루투스, 와이파이 연결, GCM notification listener 등)이 있다면 서비스로 구현 해야한다. 


1
2
3
4
5
6
7
8
9
10
11
12
public class MyService1 extends Service {   
    public void onCreate() {
        Thread t = new Thread() {
            void run() {  }
        };
        t.start();
    }
 
    public void onDestroy() { 
 
    }
}

cs


서비스 클래스를 상속받아서 구현한다.

서비스의 생명 주기는 2가지로 분류가 된다
로컬 서비스를 구현할 때와
원격 서비스를 구현할 때이다


로컬 서비스

onCreate()

서비스가 생성될때 호출된다

onStart()

startService() 메소드에 의해 서비스가 시작될때마다 호출된다

onDestory()

서비스가 종료될때 호출


원격 서비스

onCreate()

서비스가 생성될때 호출된다

onBind()

bindService() 메소드에 의해 서비스가 시작될때 호출된다.

onUnbind()

서비스와 연결이 끊겼을 때 호출된다.

onDestroy()

서비스가 종료 될때 호출된다.


Intent myintent = new Intent(this, (이동할 액티비티 이름).class);

startActivity(myintent);


Intent Service = new Intent(this, (실행할 서비스 이름).class);

startService(Service);


'Programming > Android' 카테고리의 다른 글

xml include  (0) 2016.09.15
View  (0) 2016.09.07
R  (0) 2016.09.05
안드로이드의 구성요소 요약  (0) 2016.09.05
Thread (백그라운드에서 UI변경)  (0) 2016.09.03
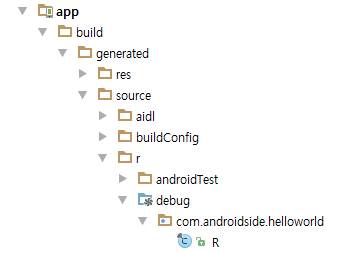
프로그래밍을 하다보면 R.layout...라는 구문을 많이 쓰게된다. 그렇다면 R은 무엇일까?
R은 R.java로 작성되어있는 정적 클래스의 정적 변수를 가르킨다.
R클래스는 안드로이드 빌드 시스템에 의해 자동으로 생성되는 자바 클래스이며,
이 클래스는 리소스를 효율적으로 접근할 수 있도록 리소스를 integer 값으로 관리하는 역할을 한다.
각 파일을 추가할때마다 R에 자동으로 저장이된다.
또한 정적파일이기때문에 어디서든지 사용이 가능하다.

R은 이곳에 위치하고있다.

1
2
3
4
5
6
7
8
9
10
11
12
13
14
15
16
17
18
19
20
21
22
23
24
25
26
27
28
29
30
public final class R {
    public static final class attr {
    }
    public static final class dimen {
        public static final int activity_horizontal_margin=0x7f050000;
        public static final int activity_vertical_margin=0x7f050001;
    }
    public static final class id {
        public static final int action_settings=0x7f080000;
    }
    public static final class layout {
        public static final int activity_main=0x7f030000;
    }
    public static final class menu {
        public static final int menu_main=0x7f070000;
    }
    public static final class mipmap {
        public static final int ic_launcher=0x7f020000;
    }
    public static final class string {
        public static final int action_settings=0x7f060000;
        public static final int app_name=0x7f060001;
        public static final int hello_world=0x7f060002;
    }
    public static final class style {
        /**  Customize your theme here. 
         */
        public static final int AppTheme=0x7f040000;
    }
}
cs

또한 R의 내용을 보면 이렇다.


그리고 자바코드에서는 리소스 자원을 R.mipmap.icon, R.layout.main, R.string.app_name 처럼 접근할 수 있으며

XML에서는 @mipmap/icon, @string/hello로 접근 할 수 있다. 


참고로 R을 인식하지 못해서 빌드 오류가 생길때가 있는데, 그때는 빌드클린을 하고 다시 빌드를하면된다.


출처 : https://kairo96.gitbooks.io/android/content/ch2.4.html

'Programming > Android' 카테고리의 다른 글

View  (0) 2016.09.07
Service  (0) 2016.09.05
안드로이드의 구성요소 요약  (0) 2016.09.05
Thread (백그라운드에서 UI변경)  (0) 2016.09.03
Toolbar  (0) 2016.09.03


액티비티

사용자 인터페이스 화면을 구성하는 컴포넌트

서비스

백그라운드에서 실행되는 컴포넌트, 시각적인 사용자 인터페이스를 가지지 없음

인텐트

컴포넌트에 액션, 데이터 등을 전달하는 메시지 컴포넌트

인텐트 필터

수신할 수 있는 인텐트를 정의하여 컴포넌트를 정의하는 역할을 하는 컴포넌트

브로드캐스트 리시버

배터리 부족, 언어 설정 변경 등의 특정 브로드 캐스트를 수신하거나 반응하는 컴포넌트, 시각적인 사용자 인터페이스를 가지지않음

콘텐트 프로바이더

애플리케이션 간의 데이터 공유를 위해 표준화된 인터페이스를 제공하는 컴포넌트

노티피케이션

사용자에게 특정 이벤트를 알리는 컴포넌트

프래그먼트

액티비티 내에서 독자적으로 동작하는 UI 컴포넌트


'Programming > Android' 카테고리의 다른 글

Service  (0) 2016.09.05
R  (0) 2016.09.05
Thread (백그라운드에서 UI변경)  (0) 2016.09.03
Toolbar  (0) 2016.09.03
manifest  (0) 2016.09.02

여름방학 프로젝트 중에 백그라운드에서 Thread를 통해 TextView를 바꾸어 주어야 할일이 생겼다.

잊어버리기전에 적어놓자


1
2
3
4
5
6
7
8
9
10
11
12
13
14
15
16
17
18
19
20
21
22
23
24
25
26
27
28
29
30
31
32
Handler handler = new Handler(){
        @Override
        public void handleMessage(Message msg) {
            mTemperture.setText(Temperture);
            ...
        }
    };
 
    @Override
    protected void onStart() {
        super.onStart();
        Thread thread = new Thread(new Runnable() {
            @Override
            public void run() {
                while(true){
                    try {
                        handler.sendMessage(handler.obtainMessage());
                        Thread.sleep(100);
                    } catch (Throwable e) {
                        e.printStackTrace();
                    }
                }
            }
        });
        thread.setDaemon(true);
        thread.start();
        Toast.makeText(getApplication(),"START",Toast.LENGTH_SHORT).show();
    }
cs


센서값을 받아올때는 Thread를 이용하여 받아오도록하였다.

sendMessge에서 보낸 msg를 handleMessge의 msg로 받아 handleMessage에서 처리한다.


또한 handler.ontainMessage()에 메시지를 사용하여 전송하고싶다면

Message msg = handler.ontainMessage(); 를 선언하여

msg.what(int)

msg.obj(Object)

msg.arg1(int)

msg.arg2(int) 등의 메시지를 담아서 전송할수도 있다.


sendemptymessage(int what)을 사용하면 ID만 핸들러로 전송할 수있다.

그러면 핸들러에서는 if(msg.ID == 0){ }안에서 수행을 해야겠지?


Deamon Thread 설정 : 메인스레드가 종료되면 이 스레드도 따라 종료됨, 스레드 종속성을 설정해줌


'Programming > Android' 카테고리의 다른 글

R  (0) 2016.09.05
안드로이드의 구성요소 요약  (0) 2016.09.05
Toolbar  (0) 2016.09.03
manifest  (0) 2016.09.02
notification 고정시키기  (1) 2016.08.28

안드로이드 스튜디오를 켜서 템플릿을 보니 네비게이션 템플릿이 있었다.

그래서 오늘은 이에대해 공부해보기로 하였다.


먼저 템플릿을 선택하여 접속하여 컴파일해보면 아래와 같은 그림이 나오는데, 


안드로이드에서 Sample있는 부분이 툴바라는 부분이다.


1
2
Toolbar toolbar = (Toolbar) findViewById(R.id.toolbar);
setSupportActionBar(toolbar);
cs

위와 같이생성되며 onCreate() 에 액티비티 생성후 만들면 된다.

그러면 이제 왼쪽에서부터 어떻게 만드는지 차례대로 살펴보자

1
2
3
4
5
6
7
8
DrawerLayout drawer = (DrawerLayout) findViewById(R.id.drawer_layout);
ActionBarDrawerToggle toggle = new ActionBarDrawerToggle(this, drawer, toolbar,
            R.string.navigation_drawer_open, R.string.navigation_drawer_close);
drawer.setDrawerListener(toggle);
toggle.syncState();
 
NavigationView navigationView = (NavigationView) findViewById(R.id.nav_view);
navigationView.setNavigationItemSelectedListener(this);
cs

위외 같이 네비게이션 뷰를 생성하고 싶다면 이렇게 생성한다. 

ActionBarDrawerToggle의 매개변수는 다음과 같다.
1
2
ActionBarDrawerToggle (Activity activity, DrawerLayout drawerLayout,
        int drawerImageRes, int openDrawerContentDescRes, int closeDrawerContentDescRes)
cs


 R.string.navigation_drawer_open와 R.string.navigation_drawer_close는 String.xml에

1
2
<string name="navigation_drawer_open">Open navigation drawer</string>
<string name="navigation_drawer_close">Close navigation drawer</string>


로 저장되어있다.


네비게이션 뷰를 누르면 이런 화면이 뜨는데, 이러한 화면은 xml에서 만들어준다. 또한 위의 코드 6-7 라인이 없으면 각각의 아이템이 클릭이 되지않는다.

아래 코드는 네비게이션 뷰 xml파일이다. 

살펴보면

android:checkableBehavior="single" 이 부분이있는데 선택형태를 정해주는 부분이다.

그종류로는 none, single, all 이 있는데, 차례대로 none은 단순리스트형태, single은 라디오 버튼형태로 단일 선택형, all은 체크박스 형태로 다중선택형을 나타낸다.

지금으로써는 없어도 무방하다.

그리고 item밑에 하위 item도 사용할수 있다. 23번라인부터 끝까지 보면 communicate로 구분을 지어서 사용하고 있다.


1
2
3
4
5
6
7
8
9
10
11
12
13
14
15
16
17
18
19
20
21
22
23
24
25
26
27
28
29
30
31
32
33
34
35
36
37
<?xml version="1.0" encoding="utf-8"?>
<menu xmlns:android="http://schemas.android.com/apk/res/android">
 
    <group android:checkableBehavior="single">
        <item
            android:id="@+id/nav_camera"
            android:icon="@drawable/ic_menu_camera"
            android:title="Import" />
        <item
            android:id="@+id/nav_gallery"
            android:icon="@drawable/ic_menu_gallery"
            android:title="Gallery" />
        <item
            android:id="@+id/nav_slideshow"
            android:icon="@drawable/ic_menu_slideshow"
            android:title="Slideshow" />
        <item
            android:id="@+id/nav_manage"
            android:icon="@drawable/ic_menu_manage"
            android:title="Tools" />
    </group>
 
    <item android:title="Communicate">
        <menu>
            <item
                android:id="@+id/nav_share"
                android:icon="@drawable/ic_menu_share"
                android:title="Share" />
            <item
                android:id="@+id/nav_send"
                android:icon="@drawable/ic_menu_send"
                android:title="Send" />
        </menu>
    </item>
 
</menu>
 
cs


그다음은 오른쪽 맨끝에있는 옵션바를 살펴보자.


1
2
3
4
5
6
    @Override
    public boolean onCreateOptionsMenu(Menu menu) {
        // Inflate the menu; this adds items to the action bar if it is present.
        getMenuInflater().inflate(R.menu.main, menu);
        return true;
    }
cs

옵션메뉴는 프래그먼트로 만들어져 있으며, 위와같이 추가한다.


1
2
3
4
5
6
7
8
9
10
11
12
13
14
15
16
17
18
@Override
    public boolean onOptionsItemSelected(MenuItem item) {
        // Handle action bar item clicks here. The action bar will
        // automatically handle clicks on the Home/Up button, so long
        // as you specify a parent activity in AndroidManifest.xml.
        int id = item.getItemId();
 
        //noinspection SimplifiableIfStatement
        if (id == R.id.action_settings) {
            Toast.makeText(getApplicationContext(),"settings",Toast.LENGTH_SHORT).show();
            return true;
        }else if(id == R.id.action_sample){
            Toast.makeText(getApplicationContext(),"sample",Toast.LENGTH_SHORT).show();
            return true;
        }
 
        return super.onOptionsItemSelected(item);
    }

cs

옵션메뉴의 메뉴를 클릭했을때 각각의상태는 위와 같이 사용하며,

현재는 settings 와 samples 항목을 만들었고 Toast로 선택시 각각의 메시지를 띄워주게 만들었다.


1
2
3
4
5
6
7
8
9
10
11
12
13
14
15
<?xml version="1.0" encoding="utf-8"?>
<menu xmlns:android="http://schemas.android.com/apk/res/android"
    xmlns:app="http://schemas.android.com/apk/res-auto">
    <item
        android:id="@+id/action_settings"
        android:orderInCategory="100"
        android:title="@string/action_settings"
        app:showAsAction="never" />
 
    <item
        android:id="@+id/action_sample"
        android:orderInCategory="100"
        android:title="@string/action_samples"
        app:showAsAction="never" />
</menu>


옵션메뉴의 xml은 위와 같이 만들었으며, 


1
2
<string name="action_settings">Settings</string>
<string name="action_samples">Samples</string>

cs


title은 string.xml에 위와같이 저장되어있다.


toolbar를 사용하여 액티비티위에 여러 메뉴를 만들수 있어서,

어플리케이션 구현시 효율적이고 이쁘게 만들수 있을것 같다.

'Programming > Android' 카테고리의 다른 글

안드로이드의 구성요소 요약  (0) 2016.09.05
Thread (백그라운드에서 UI변경)  (0) 2016.09.03
manifest  (0) 2016.09.02
notification 고정시키기  (1) 2016.08.28
JSONobject 과 JSONarray  (0) 2016.08.27

summary

어플리케이션의 프로필 느낌

어플리케이션에 대한 전반적인 정보를 담고 있는 파일

안드로이드 시스템에서 어플리케이션의 정보를 알아내는데 사용

어플리케이션의 컴포넌트(액티비티, 서비스, 브로드캐스트, 컨텐츠 프로바이더)가 존재

어플리케이션의 이름, 사용하는 라이브러리 등 어플리케이션에 대한 모든 정보가 포함

어플리케이션의 퍼미션 지정


GUI 설정 메뉴는 크게 Manifest, Application, Permissions, Instrumentation으로 구성되어 있으며, AndroidManifest.xml 탭을 클릭하면 실제로 코드를 보면서 수정할 수 있게 되어있다.


<manifest> 태그


안드로이드 메니페스트 파일은 레이아웃 파일과 유사하게 <manifest> 태그가 전체를 감싸는 구조

manifest 태그의 안에 아래에서 다루게 될 application 태그, uses-permission 태그 등


manifest 태그의 속성으로는 여기에서 사용할 네임스페이스를 지정해주는 xmlns:android 속성, 어플리케이션의 패키지명 및 버전 등


1
2
3
4
5
6
<manifest xmlns:android="http://schemas.android.com/apk/res/android"
    package="com.androidhuman.HelloAndroid"
    android:versionCode="1"
    android:versionName="1.0">
    // 어플리케이션 태그 및 Permission 태그
</manifest>
cs


<application> 태그


메니페스트 파일에는 단 한 개의 어플리케이션 태그

이는 어플리케이션에 대한 정보 (어플리케이션 이름, 아이콘, 테마 등) 뿐 아니라 어플리케이션 내의 컴포넌트들에 대한 태그들을 포함


1
2
3
4
5
6
7
8
9
<application android:icon="@drawable/icon" android:label="@string/app_name">
<activity android:name=".MainActivity"
          android:label="@string/app_name">
    <intent-filter>
        <action android:name="android.intent.action.MAIN" />
        <category android:name="android.intent.category.LAUNCHER" />
    </intent-filter>
</activity>
</application>
cs


1. <activity> 태그


어플리케이션 내의 각 액티비티 마다 이 activity 태그가 필요

activity 태그에는 액티비티의 이름, 클래스 이름 및 액티비티가 받을 수 있는 인텐트가 정의되어 있는 인텐트 필터를 포함

메니페스트 파일에 액티비티가 정의되어 있지 않다면 해당 액티비티를 실행시킬 수 없으므로 런타임 오류가 발생

메니페스트 파일에 액티비티를 정의


1
2
3
4
5
6
7
<activity android:name=".MainActivity"
    android:label="@string/app_name">
    <intent-filter>
        <action android:name="android.intent.action.MAIN" />
        <category android:name="android.intent.category.LAUNCHER" />
    </intent-filter>
</activity>
cs


2. <service> 태그


액티비티와 마찬가지로 서비스 또한 액티비티와 마찬가지로 각 서비스마다 서비스 태그를 정의해주어야 함

서비스를 실행할 수 있는 인텐트가 정의된 인텐트 필터를 포함


1
2
3
4
5
6
<service android:name=".app.RemoteService" android:process=":remote">
    <intent-filter>
        <action android:name="com.example.android.apis.app.IRemoteService" />
        <action android:name="com.example.android.apis.app.REMOTE_SERVICE" />
    </intent-filter>
</service>
cs


3. <provider> 태그


어플리케이션의 컨텐트 프로바이더 (Content Provider)를 등록하기 위해 사용

컨텐트 프로바이더는 어플리케이션 내의 데이터베이스를 다른 어플리케이션이 공유할 수 있도록 해주는 역할.


1
2
<provider android:name=".app.SearchSuggestionSampleProvider"
android:authorities="com.example.android.apis.SuggestionProvider" />
cs


4. <receiver> 태그


어플리케이션이 브로드캐스트 메시지 (시스템의 상태정보에 관련된 메시지 : 인텐트로 구성됨)를 수신할 수 있도록 합니다. <receiver> 태그 안에 인텐트 필터를 정의하여 어떠한 브로드캐스트 메시지에 반응할지를 지정합니다.


1
2
3
4
5
6
7
<receiver android:name=".appwidget.ExampleAppWidgetProvider">
<meta-data android:name="android.appwidget.provider"
    android:resource="@xml/appwidget_provider" />
    <intent-filter>
        <action android:name="android.appwidget.action.APPWIDGET_UPDATE" />
    </intent-filter>
</receiver>
cs


5. <uses-permission> 태그


어플리케이션에 시스템의 여러가지 정보들 (위치정보, SMS 수신, 전화 걸기, 주소록 읽기, 인터넷 사용 등...)을 사용하기 위해서는 그에 해당하는 권한이 필요

<uses-permission> 태그에는 이렇게 어플리케이션에서 필요한 권한들을 정의


1
2
3
4
5
<uses-permission android:name="android.permission.READ_CONTACTS" />
<uses-permission android:name="android.permission.WRITE_CONTACTS" />
<uses-permission android:name="android.permission.VIBRATE" />
<uses-permission android:name="android.permission.ACCESS_COARSE_LOCATION" />
<uses-permission android:name="android.permission.INTERNET" />
cs


'Programming > Android' 카테고리의 다른 글

Thread (백그라운드에서 UI변경)  (0) 2016.09.03
Toolbar  (0) 2016.09.03
notification 고정시키기  (1) 2016.08.28
JSONobject 과 JSONarray  (0) 2016.08.27
AsyncTask  (0) 2016.08.26

setOngoing(true)추가하기

1
2
NotificationCompat.Builder notificationBuilder = new NotificationCompat.Builder(this)
                .setOngoing(true);
cs


'Programming > Android' 카테고리의 다른 글

Toolbar  (0) 2016.09.03
manifest  (0) 2016.09.02
JSONobject 과 JSONarray  (0) 2016.08.27
AsyncTask  (0) 2016.08.26
AccessibilityService  (0) 2016.08.26

+ Recent posts