ScrollView

ScrollView는 말그대로 스크롤을 할수있게 해주는 뷰이다

다음과 같이 사용한다. 


1
2
3
4
<ScrollView
   android:layout_width="match_parent"
   android:layout_height="wrap_content">
</ScrollView>
cs


HorizontalScrollView

ScrollView는 가로방향으로 할수없다.

그래서 따로 HorizontalScrollView를 사용해서 가로로 넘길수 있도록 한다.


1
2
3
4
5
<HorizontalScrollView
        android:layout_width="match_parent"
        android:layout_height="wrap_content">
</HorizontalScrollView>
 
cs


'Programming > Android' 카테고리의 다른 글

Custom Listview  (0) 2016.09.24
ListFragment  (0) 2016.09.24
xml 경계선  (1) 2016.09.15
xml include  (1) 2016.09.15
View  (0) 2016.09.07

LinearLayout을 하나만들고 패딩을 1dp 와 같이 아주 얅게 설정한다음

Backgroud 색을 설정해서 사용하면 경계선처럼 보인다.


1
2
3
4
5
6
7
<LinearLayout
        android:layout_width="match_parent"
        android:layout_height="wrap_content"
        android:padding="1dp"
        android:background="@color/boundary">
</LinearLayout>
 
cs


'Programming > Android' 카테고리의 다른 글

ListFragment  (0) 2016.09.24
ScrollView  (0) 2016.09.15
xml include  (1) 2016.09.15
View  (0) 2016.09.07
Service  (0) 2016.09.05


xml을 include하는 방법은 아래와 같다

<include
layout="@layout/content_login"
android:layout_width="match_parent"
android:layout_height="match_parent" />


근데 이걸왜 굳이 해야하는지 모르겠다.


그냥 안드로이드 스튜디오에서 Activity파일을 만드니까 activity_login과 content_login파일이 따로 생성되어

연결되어있더라..


'Programming > Android' 카테고리의 다른 글

ScrollView  (0) 2016.09.15
xml 경계선  (1) 2016.09.15
View  (0) 2016.09.07
Service  (0) 2016.09.05
R  (0) 2016.09.05

Export


1
2
3
4
5
6
var exports = module.exports = {};
 
 
exports.name = function(){
    //doSomething
};
cs

.js 파일은 만들고 위와 같이 입력한다.
함수를 사용할때는 4-6라인처럼 입력하면된다.


Import

1
const db = require('../routes/sample.js');
cs

export와 import를 이용하여 코드를 깔끔하게 작성할 수 있다.


'Programming > Node.JS' 카테고리의 다른 글

지금 현재 서버의 ip를 알고 싶을때  (0) 2016.09.14
mysql 모듈  (1) 2016.09.05
Cluster  (0) 2016.09.05
코딩의 관례  (0) 2016.09.05
express.js 구조  (0) 2016.09.05

var ip = req.headers['x-forwarded-for'] || req.connection.remoteAddress


'Programming > Node.JS' 카테고리의 다른 글

Export / Import  (0) 2016.09.14
mysql 모듈  (1) 2016.09.05
Cluster  (0) 2016.09.05
코딩의 관례  (0) 2016.09.05
express.js 구조  (0) 2016.09.05

View & View Group

View가 모인것이 View Group

View GroupView에 대해서 위치를 결정할 수 있다.


Layout


리니어 수평 수직

java.lang.Object
  ↳ android.view.View
    ↳ android.view.ViewGroup

      ↳ android.Widget.LinearLayout


속성 :

기본으로 패딩이 없다.

방향 : orientation : Vertiacal, Horizontal

정렬방향 :

- 부모 : layoutgravity : 부모안에 있는 layout이 정렬됨

- 자식 : gravity : view안에있는 모든 것이 정렬됨

-> layout* : 부모안에있는 / 그냥* : View안에

공간가중치 : 화면에 뷰끼리 위치를 차지 하기 위한 비율 (0 ~ 3), 기본값 0


릴레이티브 뷰간의 관계

- 자식뷰(옆에), 부모뷰(안에)


프레임 화면의 위치를 정해서 사용함

View를 겹칠 수 있다.

한칸에 여러 View가 들어 갈 수 있다.

테이블과 비슷


테이블 - 화면의 위치를 정해서 사용함

View를 겹칠 수 없다.

바둑판형식

레알 테이블모양

java.lang.Object
  ↳ android.view.View
    ↳ android.view.ViewGroup

      ↳ android.Widget.LinearLayout

  ↳ android.Widget.TableLayout

규격화 되어있다. 리니어를 상속 받았기 때문에

<TableRow> </TableRow>

자식들은 열간격은 같고 행간격은 달라질 수 있다.

default : wrap_contents

ex) 리모콘 만들기


android:layout_width / height

- fill_parent : 화면 전체 크기

- match_parent : 부모의 크기 상속

- wrap_content : 안에 객체 내용물에 맞게 맞추어진다. 감싸진다.


앱솔루트 하나의 뷰에 대해서 크기와 높이 값이 정해져 있는 것 (3dp, 4dp) - 잘안씀

높이 100dip 단위 종류가 개 많아

가로 200dip(기본단위)


화면 크기가 다다르니까 배치도 달라진다. 그래서 안씀ㅋㅋㅋㅋ


스크롤뷰

java.lang.Object
  ↳ android.view.View
    ↳ android.view.ViewGroup
      ↳ android.widget.FrameLayout
        ↳ android.widget.ScrollView


1
2
3
4
5
6
7
<ScrollView xmlns:android="http://schemas.android.com/apk/res/android"
    android:layout_width="match_parent"
    android:layout_height="wrap_content" >
 
     /*Something*/
 
</ScrollView>
cs


버튼 종류

Button

확인

Radio Button

남자 여자

property {

  OncheckedChangedListner(){ /*do Something*/ }

  SetOnchangedListner(){ /*do Something*/ }

}

Check Box

티비보기 컴퓨터 책읽기

TextView

EditView

ImageView

  android tint: scaletype maxWidth maxHeight

'Programming > Android' 카테고리의 다른 글

xml 경계선  (1) 2016.09.15
xml include  (1) 2016.09.15
Service  (0) 2016.09.05
R  (0) 2016.09.05
안드로이드의 구성요소 요약  (0) 2016.09.05

서비스는 특정 액티비디와 상관 없이 백그라운드에서 실행되는 컴포넌트이다. 그래서 화면을 구성하는 레이아웃을 작성할 필요가 없다. 그러므로 지속적으로 장시간 동작해야하는 기능(블루투스, 와이파이 연결, GCM notification listener 등)이 있다면 서비스로 구현 해야한다. 


1
2
3
4
5
6
7
8
9
10
11
12
public class MyService1 extends Service {   
    public void onCreate() {
        Thread t = new Thread() {
            void run() {  }
        };
        t.start();
    }
 
    public void onDestroy() { 
 
    }
}

cs


서비스 클래스를 상속받아서 구현한다.

서비스의 생명 주기는 2가지로 분류가 된다
로컬 서비스를 구현할 때와
원격 서비스를 구현할 때이다


로컬 서비스

onCreate()

서비스가 생성될때 호출된다

onStart()

startService() 메소드에 의해 서비스가 시작될때마다 호출된다

onDestory()

서비스가 종료될때 호출


원격 서비스

onCreate()

서비스가 생성될때 호출된다

onBind()

bindService() 메소드에 의해 서비스가 시작될때 호출된다.

onUnbind()

서비스와 연결이 끊겼을 때 호출된다.

onDestroy()

서비스가 종료 될때 호출된다.


Intent myintent = new Intent(this, (이동할 액티비티 이름).class);

startActivity(myintent);


Intent Service = new Intent(this, (실행할 서비스 이름).class);

startService(Service);


'Programming > Android' 카테고리의 다른 글

xml include  (1) 2016.09.15
View  (0) 2016.09.07
R  (0) 2016.09.05
안드로이드의 구성요소 요약  (0) 2016.09.05
Thread (백그라운드에서 UI변경)  (0) 2016.09.03
프로그래밍을 하다보면 R.layout...라는 구문을 많이 쓰게된다. 그렇다면 R은 무엇일까?
R은 R.java로 작성되어있는 정적 클래스의 정적 변수를 가르킨다.
R클래스는 안드로이드 빌드 시스템에 의해 자동으로 생성되는 자바 클래스이며,
이 클래스는 리소스를 효율적으로 접근할 수 있도록 리소스를 integer 값으로 관리하는 역할을 한다.
각 파일을 추가할때마다 R에 자동으로 저장이된다.
또한 정적파일이기때문에 어디서든지 사용이 가능하다.

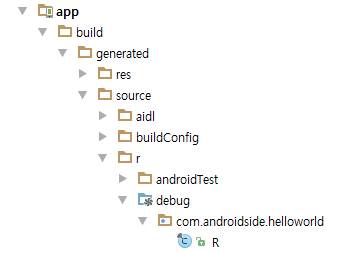
R은 이곳에 위치하고있다.

1
2
3
4
5
6
7
8
9
10
11
12
13
14
15
16
17
18
19
20
21
22
23
24
25
26
27
28
29
30
public final class R {
    public static final class attr {
    }
    public static final class dimen {
        public static final int activity_horizontal_margin=0x7f050000;
        public static final int activity_vertical_margin=0x7f050001;
    }
    public static final class id {
        public static final int action_settings=0x7f080000;
    }
    public static final class layout {
        public static final int activity_main=0x7f030000;
    }
    public static final class menu {
        public static final int menu_main=0x7f070000;
    }
    public static final class mipmap {
        public static final int ic_launcher=0x7f020000;
    }
    public static final class string {
        public static final int action_settings=0x7f060000;
        public static final int app_name=0x7f060001;
        public static final int hello_world=0x7f060002;
    }
    public static final class style {
        /**  Customize your theme here. 
         */
        public static final int AppTheme=0x7f040000;
    }
}
cs

또한 R의 내용을 보면 이렇다.


그리고 자바코드에서는 리소스 자원을 R.mipmap.icon, R.layout.main, R.string.app_name 처럼 접근할 수 있으며

XML에서는 @mipmap/icon, @string/hello로 접근 할 수 있다. 


참고로 R을 인식하지 못해서 빌드 오류가 생길때가 있는데, 그때는 빌드클린을 하고 다시 빌드를하면된다.


출처 : https://kairo96.gitbooks.io/android/content/ch2.4.html

'Programming > Android' 카테고리의 다른 글

View  (0) 2016.09.07
Service  (0) 2016.09.05
안드로이드의 구성요소 요약  (0) 2016.09.05
Thread (백그라운드에서 UI변경)  (0) 2016.09.03
Toolbar  (1) 2016.09.03

+ Recent posts